STEP 4 : 分布式配置中心 (Spring Cloud Config)
什么是Spring Cloud Config
一个完整的项目通常会需要许多的配置文件,一般我们会将这些配置文件以多种方式存储,最常见的就是直接将properties或者yml文件直接打包到项目中,这样做虽然简单但是如果我们修改配置文件,就必须重新打包发布项目。如果这个项目正好是一个分布式服务,且需要发布到很多台服务器上,这样每次修改配置文件就会造成很大的工作量,这当然是我们不愿意看见的。
随着分布式微服务的不断增加,系统的可伸缩、可拓展性的重点就落到了配置管理这个问题上,所以就产生了配置中心这个概念,即所有的配置交由配置中心进行统一管理。
Spring Cloud Config即是一个分布式的配置中心,它具有中心化、版本控制、支持动态更新、平台独立、语言独立等特性。其特点是:
- 提供服务端和客户端支持(spring cloud config server和spring cloud config client)
- 集中式管理分布式环境下的应用配置
- 基于Spring环境,无缝与Spring应用集成
- 可用于任何语言开发的程序
- 默认实现基于git仓库,可以进行版本管理
- 可替换自定义实现
Spring Cloud Config官网是:https://cloud.spring.io/spring-cloud-config/
Spring Cloud Config的原理如图所示:
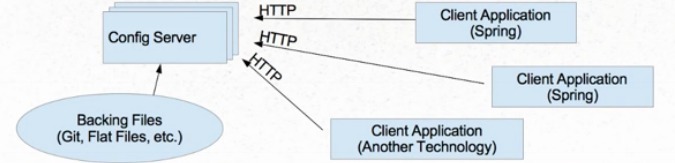
server 服务端
构建一个简单的Config server非常简单,我将在原有spring-cloud-eureka-client项目上进行修改。
首先需要引入资源:
<dependency>
	<groupId>org.springframework.cloud</groupId>
	<artifactId>spring-cloud-config-server</artifactId>
</dependency>
然后在Application启动类上添加 @EnableConfigServer 注解:
由于使用原有服务进行改造的,所以已经包含了eureka注册中心的配置。即在Application类中添加 @EnableDiscoveryClient 注解。
@SpringBootApplication
@EnableEurekaClient
@EnableConfigServer
public class SpringCloudEurekaClientApplication {

	public static void main(String[] args) {
		SpringApplication.run(SpringCloudEurekaClientApplication.class, args);
	}
}
最后,修改 application.properties 配置文件:
spring.application.name=spring-cloud-eureka-client
server.port=1001
eureka.client.service-url.defaultZone=http://127.0.0.1:9999/eureka/

# 使用git对配置文件进行管理
# 配置git仓库位置
spring.cloud.config.server.git.uri=
# 配置仓库路径下的相对搜索位置,可以配置多个
spring.cloud.config.server.git.searchPaths=
# 访问git仓库的用户名
spring.cloud.config.server.git.username=
# 访问git仓库的用户密码
spring.cloud.config.server.git.password=git仓库的文件目录结构如下(具体结构可以到我的github上看:maxith’s github):
+– spring-cloud-config
| +– config-repo
| +– app-dev.properties
| +– app-official.properties
| +– app-test.properties
我在properties配置文件中分别设置了dev、test和official:
hello.world=”Hello world!I’m dev(test official).”
然后我们运行服务,测试是否可以读取到配置信息.
URL与配置文件的映射关系如下:
- /{application}/{profile}[/{label}]
- /{application}-{profile}.yml
- /{label}/{application}-{profile}.yml
- /{application}-{profile}.properties
- /{label}/{application}-{profile}.properties
上面的url会映射{application}-{profile}.properties对应的配置文件,{label}对应git上不同的分支,默认为master。
测试url为 http://127.0.0.1:1001/app/dev ,返回的结果如下:
{
  "name": "app",
  "profiles": [
    "dev"
  ],
  "label": null,
  "version": "f73c886e88b94c1e7e58f7cf7fcf081aace5c359",
  "state": null,
  "propertySources": [
    {
      "name": "https://github.com/Maxith/spring-cloud-study/spring-cloud-config/config-repo/app-dev.properties",
      "source": {
        "hello.world": "Hello world!I'm developer."
      }
    }
  ]
}需要注意的是,本文使用的git对配置文件进行管理,如果需要使用其他工具对配置文件进行管理的话,可以参考以下文章:
client 客户端
1. 添加依赖:
<dependency>
	<groupId>org.springframework.cloud</groupId>
	<artifactId>spring-cloud-starter-config</artifactId>
</dependency>
2. 配置文件 :
该项目我们需要用到 bootstrap.properties 配置文件,用来指定配置中心的地址:
spring.cloud.config.uri=http://127.0.0.1:1001/		//配置中心url
spring.cloud.config.name=app						//配置名称
spring.cloud.config.profile=dev						//配置文件类型
spring.cloud.config.label=master					//git分支,默认master

spring.cloud.config.discovery.enabled=true			//开启Config服务发现支持
spring.cloud.config.discovery.service-id=spring-cloud-eureka-client //指定server端的name,也就是server端spring.application.name的值在Application类中添加@EnableDiscoveryClient注解,激活服务发现功能。
3.使用配置
使用配置和常规的本地配置文件一样,可以使用注解 @Value 或者使用 Environment 配置对象的方式进行使用,在此我就不加赘述了。
结束
本文部分文本来源于互联网
感谢以下文章提供的灵感和帮助