[外传] Spring Cloud Eureka Server服务注册中心高可用方案
在微服务架构中,作为核心的服务注册中心是整个系统的关键,它的高可用性决定了系统的整体的稳定性。
在前面的学习中我们讲到,Eureka Servers是单点运行的,但是它本身也算是一个微服务,所以它可以再多个Eureka Server实例中互相注册,这样就可以构建一个高可用的Eureka Server的服务集群。
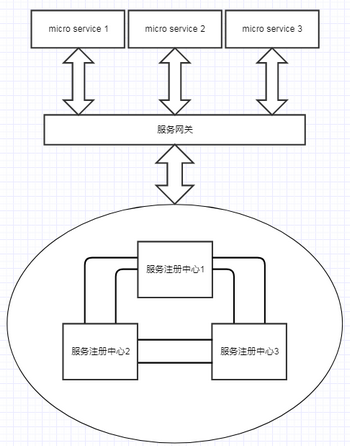
注册中心的搭建
1. 创建项目
创建spring boot项目 spring-cloud-eureka-server,在SpringCloudEurekaServerApplication中添加EnableEurekaServer注解:
@SpringBootApplication
@EnableEurekaServer
public class SpringCloudEurekaServerApplication {

	public static void main(String[] args) {
		SpringApplication.run(SpringCloudEurekaServerApplication.class, args);
	}
}
2. 添加配置
由于我们需要运行三个服务,所以我们需要准备三个配置文件:
application-peer1.properties:
spring.application.name=spring-cloud-eureka-server

server.port=9001

eureka.client.service-url.defaultZone=http://192.168.1.110:9002/eureka/,http://192.168.1.110:9003/eureka/application-peer2.properties:
spring.application.name=spring-cloud-eureka-server

server.port=9002

eureka.client.service-url.defaultZone=http://192.168.1.110:9001/eureka/,http://192.168.1.110:9003/eureka/application-peer3.properties:
spring.application.name=spring-cloud-eureka-server
server.port=9003
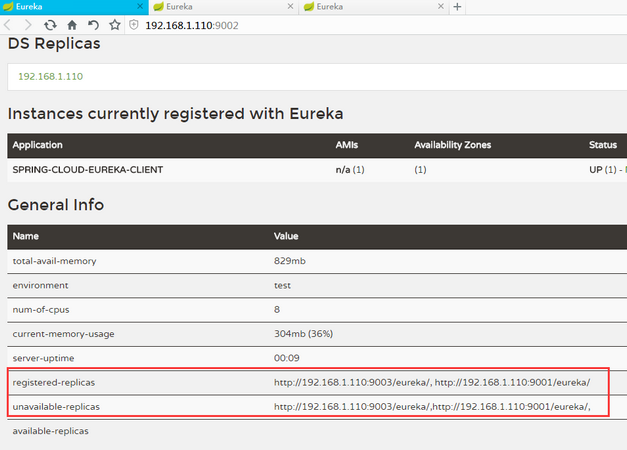
eureka.client.service-url.defaultZone=http://192.168.1.110:9001/eureka/,http://192.168.1.110:9002/eureka/从上面的配置可以看出来,我们使用三个服务,并且将其两两注册,这样我们的就算是其中一个down掉,依然可以正常运行。
3. 打包运行
使用maven命令将项目进行打包。
使用java命令来启动项目:
java -jar spring-cloud-eureka-server-0.0.1-SNAPSHOT.jar –spring.profiles.active=peer1
java -jar spring-cloud-eureka-server-0.0.1-SNAPSHOT.jar –spring.profiles.active=peer2
java -jar spring-cloud-eureka-server-0.0.1-SNAPSHOT.jar –spring.profiles.active=peer3
启动成功后就可以在注册中心页面看见对应的另外两个注册中心了:
4. 微服务注册
服务注册中心运行起来以后我们就可以将服务注册到注册中心了,由于三个注册中心都是互相关联的,所以我们只需要在其中一个注册我们的服务就可以在其他两个注册中心看见我们的服务了。
当然我们也可以使用nginx、zuul等服务网关对服务进行一个负载均衡,这里我们使用nginx对服务进行负载均衡,具体设置如下:
worker_processes  1;

events {
    worker_connections  1024;
}


http {
    include       mime.types;
    default_type  application/octet-stream;

    sendfile        on;

    keepalive_timeout  65;

    upstream eureka-server{
    	server 192.168.1.110:9001;
    	server 192.168.1.110:9002;
    	server 192.168.1.110:9003;
    }

    server {
        listen       80;
        server_name  192.168.1.110;

        location / {
            proxy_set_header Host $host;

            proxy_set_header X-Real-IP $remote_addr;

        	proxy_set_header X-Forwarded-For $proxy_add_x_forwarded_for;

        	proxy_pass http://eureka-server/;
        }

        error_page  404              /404.html;

        # redirect server error pages to the static page /50x.html
        #
        error_page   500 502 503 504  /50x.html;
        location = /50x.html {
            root   html;
        }

    }

}
最后,我们需要修改微服务的配置文件,将我们的高可用注册中心设置进去:
spring.application.name=spring-cloud-eureka-client

server.port=1001

eureka.client.service-url.defaultZone=http://192.168.1.110/eureka/
结束
本文部分文本来源于互联网
感谢以下文章提供的灵感和帮助